The wan port on the router does not work. What is WAN and LAN in a router
The forums don’t very often consider the question of how to use a router if the only WAN port burns out. By the way, such a phenomenon is not uncommon, and the essence of the fight against its consequences is not clear to everyone. To put it simply, we want to combine several hardware ports into a switch, one of which will be the burned WAN port. What to do next is clear to everyone: just connect the provider’s cord to another connector. The problem is that not all firmware supports creating a switch between LAN and WAN. And sometimes this is physically impossible - in some chipsets, LAN ports are combined into a switch in hardware.
Network router, 5 Ethernet connectors
So, we can come to the conclusion that there are two classes of routers:
- With built-in “iron” switch
- With five independent ports (or three, depending on your luck).
We are not interested in the first class; nothing can be fixed here. And in more expensive devices, where all ports “hang” on independent Ethernet controllers, the “STB IPTV” option is usually provided. Its presence, as you may have guessed, makes it possible to create a switch between the WAN port and one of the LAN ports. How to use this option in relation to our goals is discussed further.
Professional routers and ZyXEL
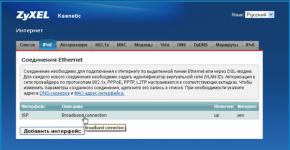
Any professional-level router is equipped with a sufficient number of Ethernet controllers. Therefore, any of the Ethernet connectors can easily be used as a WAN port, there’s not even anything to talk about. ZyXEL Keenetic routers have a similar property if they use second-generation firmware. Having entered the web interface, just open the “Internet” tab -> “IPoE” and click on the “ISP” line:

IPoE connection setup page
A tab will open in front of you, where in one click you can select which connector should become a WAN port:

Checking the “Use connector” checkbox
Don't forget to click "Apply" when finished.
It would be stupid if the first generation firmware did not have such capabilities. If your Keenetic router belongs to generation “1”, simply open the “Home Network” -> “IP-TV” tab:

STB port selection tab
Here, that is, on the specified tab, we select the “Assign LAN connector” option in the top list. All that remains is to indicate which connector will replace the WAN port. Click “Apply” and connect the provider’s cord to the LAN port indicated in the lower list.
For greater reliability, it is better to first check the box marked with the phrase “Only for the receiver.”
ASUS, TP-Link, D-Link devices
As you understand, in some web interfaces you need to specify the LAN port intended for the STB set-top box. It is then used as a WAN port. In more modern interfaces, everything is arranged “honestly”: here we simply choose which connector the provider’s cord is connected to. But sometimes both of these options are missing. This is almost always due to the fact that the chipset is equipped with only two Ethernet controllers. In general, it is better to start repairs by searching for information about the chipset.
D-Link: combining ports 4, 5
The interface of D-Link routers uses a number designation for all hardware ports. We must create a switch that combines two elements: the fourth, the fifth. To do this, on the “Connections” tab, first get rid of the WAN connection:

How to delete an active connection
All further actions are performed on another tab called “Advanced” -> “VLAN”.
So, when you open the “VLAN” page, you will see two lists. We need to rearrange the interfaces the way we need them:
Click on the “lan” rectangle, select the “port4” line, click the “Delete port” button and save the changes.

“Port4” is removed from “lan”

Add "port4" to "wan"
All that remains is to find the “Port” list in the tab that opens, select “port4” in it, and save the changes. After clicking the “Save” button located at the top, you can reconfigure the WAN connection on the “Connections” tab (click “Add”).
We looked at how WAN and LAN4 connectors are combined into a switch. However, on the start page you could select “IPTV Wizard” to specify which port is used for the STB set-top box.
Connect STB, ASUS interface
In ASUS devices, you can specify what will be used to connect a TV set-top box. Thus, you can combine a couple of ports into a switch, including WAN. If the interface contains an item designated “IPTV”, you should use this:

“Additional settings” –> “WAN” –> “IPTV”

“Advanced settings” –> “WAN” –> “Internet”
The list with an arrow is what we need. Select one of the connectors.
Note that there is no point in opening Internet settings if in your case there is an “IPTV” tab available.
That is, the “Select STB port...” list is never duplicated. But he may be absent altogether. We looked at what causes this.
TP-Link routers: turn on the switch
Once upon a time there was a TP-Link router model TL-WR340GD revision 3.1. After the WAN connector burned out, the firmware was updated. Its version numbered V3_110701, as it turned out, contains the “Bridge” menu item. When you go to this tab, you will find this:

Forced creation of a WAN-LAN4 switch
Of course, a fourth port was specified so as not to take up many connectors, and after saving the settings, the device was successfully connected to the provider.
Everyone knows that the interface of TP-Link routers, no matter what model we are talking about, always looks the same.
This means that you need to look for the “Bridge” element in the “Network” menu, and if it is there, use the capabilities of the router. If the specified tab is missing, you can update the software, but it is not a fact that a new option will appear. Not all devices can work with a redundant connector in principle. We have already talked about this.
Checking the functionality of the hardware port
When a PC at home stops seeing the Wi-Fi network, many people immediately start calling the provider’s service and wait until they are given advice, or until a specialist arrives at the house. However, you can often solve the problem of lack of network yourself: it will be easier, faster, and in some cases, even cheaper.
So, why doesn’t your computer or laptop see the network? There are only three main reasons - the problem may be in the computer, in the Wi-Fi router, or in the drivers. Let's take a closer look at them.
PC or laptop does not see Wi-Fi: reasons
In some cases, a PC or laptop may not see the network due to the fact that its connection has failed. Many laptops have a special button on their keyboard (or case) that turns Wi-Fi on and off. If you accidentally clicked on it, you could inadvertently disable network access and not notice it. In this case, just turn on the button.
If there is no button, look at the designation icon located on the Start panel near the time. If the icon is missing, go to and find “Network and Sharing Center”. There, select the item called "Change adapter settings" and make sure that the Wireless network connection is turned on. If not, turn it on.
Router or access point is not working


If you are using a router, then the internet cable should be connected to the Wan connector, and the computer and router are connected with a patch cord connected to the LAN connector.
Problems with the cable or network card
The wire is securely connected, but there is still no Internet on the computer. Next, you need to make sure that your PC can see the network connection at all. If all is well, the indicator near the connector on the motherboard (or the corresponding indicator on the router) should light or blink.
If the computer does not see the connection, then on the “Taskbar” you will see this cross icon.

Because of this, the PC may not see the connection.
- The computer's network card is faulty - you need to either install another card in the system unit, or plug the cord into another computer and see if there is contact there.

- Problems with the wire - check for damage or breaks. It is also possible that the RJ-45 connector itself is faulty.

- If no visible damage is found, then you need to call your provider and find out if there are any problems on their part. It happens that a line breaks, or the network equipment fails, so the PC does not see the Internet cable (I recently had this exact problem, the provider was doing something tricky).
The indicator blinks, but still does not work
If the indicator on the motherboard is blinking, most likely there is a signal, but for some reason the icon on the “Taskbar” is still crossed out. In this case, you need to install the network driver or reinstall if there are any problems with it. This situation can happen if, for example, you have just reinstalled the system. Until you install the necessary network driver, the Internet on your computer via cable will not work. To search and update drivers, I recommend using the program described in.
 After installation, there should be no icons (yellow exclamation marks, etc.) next to the network adapters in the device manager.
Connection disabled
The driver is installed, but your computer still does not connect to the Internet. Then check if the network connection is disabled. To do this, open Control Panel ➜ (Network and Internet)➜ ➜.

If it’s the same as in the screenshot, then right-click on the connection and select in the window that opens Turn on.

You need to set up an Internet connection
Not all providers use automatic distribution of IP addresses and DNS servers. Those. It’s not always possible to just insert a cable and everything will work right away. Very often you need to set up a connection with your provider (PPPOE, PPTP, L2TP) by specifying your login and password to connect. It is better to find out exactly what protocol you are using and how exactly to configure it from your provider.
Some companies require you to manually register the IP address allocated to you and the necessary DNS servers (usually they are specified in the agreement with the provider). To do this, open Control Panel➜ (Network and Internet)➜ Network and Sharing Center➜ (Change adapter settings). Now right-click on your network connection and select Properties. Find Internet Protocol Version 4 and click again Properties. Manually enter the required addresses and click OK.

It also happens the other way around, when “manual” settings are installed, but “automatic” ones are needed.
Problems with the router
In general, you need to go to the browser, find and open it Settings.

Next we need to find Connection parameters and check the box opposite Automatically detect proxy settings for this network(your names of points may differ, but the essence remains the same).

That's all. I hope my article was useful to you and helped you understand why the Internet via cable does not work on your computer. If you haven’t found a solution to your problem, write in the comments, we’ll figure it out together.
In modern life, the presence of a computer at home or at work automatically means the presence of a network on it, either local or with Internet access. With a network card, your computer allows you to receive information, communicate, and sometimes even work or play. Naturally, when the network disappears for some reason, we feel as if cut off from the vast sea of opportunities that it gave us.
This happened to me too. I turn on the computer, the system is loading - and what do I see? A message about an unconnected network cable in the middle of the screen. But I was just going to check my email and read the latest news, and we should also not forget that in order to comfortably watch movies or work, you also need a computer. Why such a misfortune with the cable? Why doesn't the network card see the cable? Windows 7 was recently installed on the computer. Moreover, just yesterday everything was working fine - and yet the problem still exists and needs to be fixed.
Cable check
First of all, I checked the cable itself - what if it really wasn’t connected? Sometimes this happens if it is accidentally touched or pulled out while moving a laptop or computer. To check, just pull the cable out to the end and insert it back. There should be a slight click, indicating that the cable is in place. Is the problem still there? We continue our further search for a solution.
We take out the cable again and carefully inspect it. It's worth starting with the connector itself - it can be physically damaged, which will be noticeable by cracks on the connector or bent and missing contacts. If the search results are positive, the connector should be replaced. If everything is in order, the inspection smoothly proceeds directly to the cable. The main attention should be paid to kinks and breaks in the braid. If damage is detected, the cable is replaced, completely or partially. In principle, the not too high price allows you to avoid wasting time on replacing part of it. It’s easier to do this with the entire cable up to its nearest twist, the distance to which inside an apartment or office rarely exceeds 10 m.
Checking your computer
After checking for physical damage, I regretfully noted the fact that the network card still does not see the cable on the laptop. Which means it’s not the cable at all.

Is it possible that the problem is hidden in the computer? Here the check is quite simple, although this will require another device with a network card. We connect the cable to it and see if the Internet appears. If yes, then you should look for the reason in the drivers or settings of your network card. However, there may also be an option with damage or malfunction of the card, which in this case will simply have to be replaced.
However, do not rush to get rid of the network card until you check its settings. For some reason, they could go wrong on their own - to fix such a problem, you should contact your Internet provider and check with them exactly how your settings should be. And some similar devices that support data transfer at a speed of 1 Gbit/s occasionally experience problems that require setting the operating mode settings to no more than 100 Mbit/s.

And it happens that the network card does not see the Internet cable and “swears”, sending you messages about non-connection when its control programs - drivers - go wrong and stop working correctly. Reinstalling drivers is possible, for example, from the system disk supplied with the equipment or can also be configured on the computer. If such options do not suit you, then you will have to download programs from the Internet, however, on another computer, because yours does not yet see the network. For comfortable work on the Internet.
conclusions
Carrying out all the checks described above will not be difficult for any person more or less familiar with a computer. However, if any of them causes you difficulties or none of the checks helped, you will have to contact a computer service center.
One fine sunny summer day, quite quickly (as usually happens in the summer) a thunderstorm formed over the area where I live. And of course, what would a summer thunderstorm be without thunder and lightning? After one of the lightning strikes, my TP-LINK841N router completely lost contact with the outside world, in other words, its WAN port burned out.
An initial examination of the victim showed that the patient is most likely alive, although not all organs are working. With the WAN port, everything is clear - it cannot be resuscitated, but the LAN ports even seemed to show signs of life, although two of them, the 2nd and 4th, were not able to pull more than 10 MBit (apparently, interference in the provider’s cable during a thunderstorm caused a lot of damage) according to the router), Wi-Fi worked properly and all wireless devices saw the network and successfully connected to it.
The situation is certainly sad, because this was the second victim in a month. Going to the store for a third one, without preliminary preparation - lightning protection for the provider's cable, and it entails grounding, etc., in general, somehow I didn’t want to potentially give up another 400 hryvnia to nature.
As a result, as a result of communicating with my friends on this issue, I was advised to try reassigning one of the 4 LAN ports as a WAN port. Why not.
To obtain the firmware we need, do the following:
- Let's go here http://download1.dd-wrt.com/dd-wrtv2/downloads/others/eko/BrainSlayer-V24-preSP2/.
- Select the current year (at the time of writing it is 2014).
- We select the latest version of the release (at the time of writing it is 06-23-2014-r24461).
- Based on the router model and hardware version, we find the corresponding section (in my case it is tplink_tl-wr841ndv8).
As a result, we will get (for my router) this path http://download1.dd-wrt.com/dd-wrtv2/downloads/others/eko/BrainSlayer-V24-preSP2/2014/06-23-2014-r24461 /tplink_tl-wr841ndv8/ .
Because Previously, my router worked on factory firmware, to switch to DD-WRT you will need a microcode file called factory-to-ddwrt.bin.
After downloading the required file, go to the web interface of the router - if the router has standard settings (and non-standard ones can always be reset using the reset button), then enter 192.168.1.1 in the address bar of the browser, answer the login/password request with admin/admin, respectively ( If you have a router configured for your provider, you can find the standard login and password on the back cover of the router). Go to System Tools-> Frimware Upgrade.
Router microcode update page on standard TP-Link firmware
Select the previously downloaded factory-to-ddwrt.bin file to load. Click on the Upgrade button and wait about five minutes, after the update the router will reboot. After rebooting the router, go to the address 192.168.1.1, as a result we will see something like this:
 Initial window after dd-wrt firmware
 Actually, we are asked to specify a user and password for administration via the WEB interface; the password specified here will also be for the root user when working with the router through the console. After saving the data you specified, the router will immediately ask for it when you enter the WEB interface. At this point, the procedure for changing the firmware can be considered complete.
Now, in fact, let's move on to the procedure for setting up ports. I searched quite a lot of pages both on Google and on the DD-WRT forum, but I still couldn’t find any working recommendations (maybe I did something wrong, but nothing worked - the LAN port didn’t want to work as a WAN), so far I didn’t come across a comment on one of the articles on a similar topic. Unfortunately, I can’t provide a link to the original source (lost in time :)), but the essence of the advice was that in order for the LAN port to become a WAN port, the following set of commands was to be executed on the router (to execute commands and display the result of their work, use the page Administration->Commands):
vconfig add eth1 2
vconfig add eth1 3
ifconfig eth1.2 up
ifconfig eth1.3 up
swconfig dev eth1 vlan 2 set ports "0t 4"
swconfig dev eth1 vlan 3 set ports "0t 1 2 3"
swconfig dev eth1 set enable_vlan 1
swconfig dev eth1 set apply 1
brctl addif br0 eth1.3
brctl delif br0 eth1
stopservice wan
sleep 10
startservice wan
 Page for executing commands in the router shell
 To execute commands, they must be written (pasted) in the field Commands and press Run Commands.
I can’t say to what extent “by religion” this is the correct method, but it worked for me after executing these commands 3rd LAN port The router was assigned as a WAN port, received an external IP from the provider and everything worked.
In order to avoid having to repeat this whole “thing” every time you boot the router, it’s worth adding this set of commands to Startup. To do this, paste the above set of commands into the field Commands and press the button Save Startup.
In the end it should look something like this:
 This is what the page should look like after saving the commands in Startup
 At this point, the port transfer procedure can be considered completed. Next, all you have to do is configure the router to work with your provider; I didn’t have the chance to do this because... connection to my provider is via TFTP, i.e. I get the address from the provider's DHCP server.
I will be glad if this solution helped you, like me.
Sometimes a situation may occur that after a thunderstorm or heavy rain your Internet connection disappears. Moreover, the provider says that all equipment is working properly. Today, many people use a Wi-Fi router to connect to the Internet and distribute it. The first thing that can be assumed in this situation is that the WAN port on the router has failed. For those who don’t know, a WAN port is the port to which the Internet cable from the provider is connected. It is usually marked in blue. This usually happens due to a thunderstorm. This is exactly what happened to me.
In fact, what happened was that it was the new one that was purchased that burned out. Until recently, I used a router, which served me faithfully for a long time. But I had to change it due to the fact that the provider increased my Internet speed, and this router cut off this speed for me and gave me a maximum of 10 MB instead of the required 30.
The choice fell on Asus RT-N-12. A good router, a lot of positive reviews, especially since I have the same one at work and have no complaints. I especially liked the administrator interface - pleasant, understandable, with a lot of different functions.
But let's get back to our problem. What I've done? At first, I threw it on the shelf, deciding that I would use it as a repeater (repeater). One day, while communicating with a cable installer from an Internet provider office, I learned that the router has the ability to reassign the incoming Internet port, i.e. assign any of the LAN ports as incoming. I started looking for information on the Internet and as it turned out, not all routers have this capability. Somewhere it couldn’t be done without changing the firmware. But fortunately, this functionality was already installed in my router, and I solved the problem once or twice.
If you have an Asus RT-N 12 router, then in order to reassign the WAN port to one of the LAN ports, do the following:
We go to the admin panel of the router by typing the address in the browser line - 192.168.1.1 - this is the default admin panel address. If you have changed your IP address, then go to your address.


We save the result - "Apply". All. After this, you can plug the Internet cable into the selected LAN port. I selected LAN port 1.
There is a slight drawback here. Firstly, we lost one working LAN port, and secondly, the Internet connection indicator on the router will not light up. But I think it’s better this way than sending the new router to the shelf, especially since at home it’s enough for me.
If your router is not Asus, then dig deeper into the admin panel. Perhaps your firmware also contains a similar item.
That's all. Good luck to all!
And during its installation, each of us dealt with LAN and WAN connectors. They are intended for different purposes, but are used together, which often leads to confusion. Let's figure out what they are and what the difference is between them.
The Internet cable is connected through the WAN socket, and local devices are connected through the LAN.
What is LAN
This type of connection will allow you to combine a certain number of computers located at a short distance from each other into a local environment.
When purchasing a router, you may notice on the back of it there are four identical sockets of the same type. All of them are created with the purpose of connecting several PCs to one access point.

A LAN port is needed if you want to create a group to connect all the equipment inside the house to the Internet. Thus, it is possible to create a network that will cover an area of a couple of kilometers, for which they buy a cable with high bandwidth.
What is WAN
Using this type of connection, an external network is created, which represents a large number of groups and users, regardless of their location. The main difference is that the previous format is intended for internal connection of several PCs, and this type of connection is external.
There are many global networks, but the most famous and frequently used is the World Wide Web. This is what most clients prefer at different distances, since it is not limited geographically and is created using telephone wires and more modern technologies.

You probably saw a WAN type connector when purchasing and installing a router - a cable from the provider is connected to it. The joint operation of both ports is that one of them transmits a signal, which is then distributed to devices connected to the router.
Technical points
The main differences between these formats:
- The first type helps to create an internal network; WAN is used to connect users globally.
- A local group has a limit on the number of clients and territory, a global group does not.
- The ports have different data transfer protocols - Ethernet and 802.11 for local and PPP, HDLC, Frame Relay for external.