HTC Desire S - detailed instructions for getting root and installing custom firmware. Getting Root HTC Desire S s510e Htc desire s s510e firmware android 4
And the article getting Root HTC Desire S s510e will help you!
What is Root?
For those who have just become a beginner or are not an expert in the vast world of Android and are not particularly familiar with the concept of how - Root Android, as well as why it is needed, what can be done after obtaining Root rights, or how to subsequently get rid of them if they are no longer needed, all this can be found in the detailed article -!
First of all!
There are no "left" links or unnecessary actions in this article! If you really need Root Rights, then read carefully and follow step by step, this is a guarantee that you will do everything right! This article on obtaining Root rights is divided into two parts: The first part is Required components and conditions, the second part is Instructions How to get root rights using the received files and programs. If, in the process of obtaining root rights, Android constantly reboots or is in the process of eternal loading (happens extremely rarely, but still), then it’s worth it. Now let's start getting Root rights!
Android manufacturers sometimes release new firmware on which you cannot get Root using one of the suggested methods. If the article contains alternative methods, try them. Doesn't work anyway? Indicate the Android version and firmware version in the comments (don't write angry, shitty comments, it won't do you or anyone else any good). Android is frozen (will not load), read and re-read from the very FIRST PARAGRAPH, all the necessary links are present in the article!
Still have questions?
Do you have any questions or can’t get root rights to your Android? Leave comments about what worked or didn’t work for you, or what you did differently.Necessary components to Root HTC Desire S s510e
Before getting root you need to unlock Bootloader HTC
1. Computer or laptop (Windiws XP/Vista/7/8/8.1)
2. Smartphone battery charged at least 30%
3. Downloaded and installed the site’s proprietary program - Adb Run
4. HTC drivers installed on the computer
5. Download the custom recovery file for your HTC Desire S s510e recovery.img
6. Download the flashed update archive UPDATE-SuperSU.zip (or if you don’t install an alternative update archive root.zip) and move it to the smartphone’s memory card.
Instructions for Rooting HTC Desire S s510e
1. After unlocking the HTC bootloader, enter the Bootloader menu again


Option 1
2. Move the file recovery.img to the folder C:adbprogbin
3. Run the Adb Run program
4. In the Adb Run program, go to Manual -> ADB
5. Type the command
fastboot flash recovery recovery.img
4. Wait for the update to install, reboot your smartphone, now you have a custom Recovery
Option 2
Launch the site’s proprietary program - Adb RUN and go to the menu Fastboot ->Recovery, put the downloaded file recovery.img into the opened window, close it, after which the smartphone will be flashed (press the Enter button)

error waiting for device
If you have the following message on in the command window for a long time: waiting for device- Means:
- The driver is not installed or installed incorrectly - reinstall or install
- Android device is not in Bootloader mode - switch to the appropriate mode
- Incorrect connection to the USB port - use the rear USB 2.0 ports of the computer, do not use USB hubs
[collapse]
7. Install from Recovery menu previously downloaded update archive UPDATE-SuperSU.zip
8. Reboot your Root HTC Dual Sim smartphone. Root rights to the smartphone have been obtained!
9. After installing Root, update the SuperSu application in the Google Play app store
Get S-OFF on HTC
If you are faced with the question of getting Root, then HTC has made great success in preventing this! Judge for yourself, first you need it on a smartphone and after that you will need to unlock the system partition (/system) so that you can replace any files, delete applications or perform an upgrade. When the partition is closed for writing, it has the status S-ON, when unlocked S-OFF. If you need to get S-OFF on HTC, go to the article - GetCheck to see if you have Root rights on Android
June 7, 2013 at 15:00
Installing the latest (4.2.2) Android on the old HTC Desire S
- Android development
HTC Desire S can rightly be called an oldie, it has been on sale for more than two years. I've had the device for over a year and a half. Nevertheless, this is a device with very good hardware, a high-quality screen and a metal body.
Surely, like all HTC fans, I was drawn to their proprietary shell "Sense". The stock unit included Android 2.3.5 And Sense 3.0.
Then there was a whole epic waiting for the official firmware on Android 4, the completed version of which was never released. Even before the release of this firmware “for developers,” my nerves gave way and “custom”, unofficial assemblies began to be uploaded to the phone one after another. Was tested and official with Android 4.0.4. Some time passed and the choice settled on CM10.1 With Android 4.2.2 and all its delights, for which the device’s hardware is quite enough.
Let's begin!
The instructions are valid for Windows OS.
It is worth warning that you do all manipulations with your device yourself, carefully and on your own initiative; the author of this post is not responsible for anything that may happen to your device in the process.
Also, during the flashing process, the data will be erased. Contact log, SMS, etc. The phone book is restored from a Google account. It is impossible to restore the SMS archive as it could be done in “Sense”. You need to take care of this before manipulating the phone. Data on the SD card will not be affected.
What software we need during the flashing process:
1) HTC Sync drivers for working with your phone
2) Elements of Android SDK - drivers for working with the phone
3) Recovery - a program that allows you to work with your phone, memory card, firmware, etc., without an operating system on the phone itself
4) Firmware CM10.1 from Andromadus
5) GAPPS set - a set of services from Google
6) just in case, I attach Recovery, the one that is installed by default on the phone. Useful if you need to roll back to official firmware. To roll back, you also need to lock the bootloader back (see point 3 - Unlocking the bootloader).
It is worth noting that for Desire S there are other builds on Android 4.2.2, such as AOKP, PACman, AOSP, JellyTime, etc. For this article, I chose the CyanogenMod 10.1 build.
Go!
1) Install the HTC Sync package. It contains the necessary drivers for working with the phone via a PC.
2) Unpack the archive android-tools.zip to drive C (you can do this anywhere, for our convenience the address should be shorter, since these files will be accessed on the command line). Let the files be located at the following address after unpacking: C:\android\
3) Unlocking the bootloader. Necessary for replacing standard Recovery and installing custom assemblies. See how to unlock the bootloader. We don’t pay attention to the fact that our model is not in the list, select “All Other Supported Models”. Steps 5 and 6 of the instructions for unlocking the bootloader - skip, because... we already have the necessary files in the folder C:\android\.
4) Installing third-party Recovery. Necessary for working with firmware files, directly installing firmware, creating backups and formatting system memory and caches.
To login bootloader phone, you need to remove the battery for a couple of seconds and insert it back. Holding down the rocker button on your phone volume down press the power button. After a couple of seconds a blue-red-green menu will appear bootloader"A.
We connect the phone to the PC, use the volume rocker to select the line - fastboot(it is selected by default) and press the power button.
Archive from point 3 of the software for flashing - Recovery.zip unpack into C:\android\.
Open the command line. If Windows XP: Start - run - cmd. If later versions: Start - in the “Search programs and files” field write cmd, then run the found program.
Using the command line, go to the folder with our files C:\android\. To do this, type in the command line:
cd c:\android\
Enter the following code on the command line:
fastboot flash recovery recovery.img and press enter. After a couple of seconds, Recovery is installed.
5) Formatting your phone's system memory. To do this we need to go to the new, installed Recovery. How to login bootloader was discussed in the previous paragraph. On the menu bootloader"and use the volume rocker to select the green line - Recovery and press the power button of the phone. To be able to restore data and previous firmware, it is recommended to make a backup in the corresponding menu item Recovery.
IN Recovery(touch control) select a line wipe | format and choose further - wipe data/factory reset. After a few seconds, the phone's system memory will be cleared.
6) Firmware installation.. We copy the files from steps 4 and 5 of the flashing software to the memory card in the phone. To do this, in the main Recovery menu, select the item - toggle usb storage. After a couple of seconds, the memory card will be detected in the PC and you can copy the firmware and GAPPS file to it.
After copying is complete, click - Disconnect in Recovery and we get back to the main menu. Choose install from sdcard, find the copied firmware archive flinnycm101_saga_22 and install. After installing the firmware, install GAPPS in the same way. After the installation is complete, go back to bootloader, for this it is no longer necessary to manipulate the battery. In Recovery, select the bottom line - power menu and in it - reboot into bootloader
Ready? left just a little bit.
7) Kernel firmware. To do this, open the archive on your PC flinnycm101_saga_22 from point 4 of the software and copy the file boot.img V C:\android\.
Go back to the Windows command line and enter:
fastboot flash boot boot.img press enter. Ready. Now let's go to point fastboot menu bootloader"and we choose - reboot
The phone will boot with the new firmware. It will be necessary to do the initial setup of the language, Google account, etc. A few screenshots: 


The system has many interesting settings, for example, setting the vibration response time of the touch keyboard.
Thank you.
I completely forgot, I learned this myself
Today we will install new custom firmware on HTC Desire S, that is, we will update from stock Android 2.3 to 4.2.2 + Sense 5. Is it tempting? Then let's get started with the installation! If you do everything step by step, then there should be no problems. I also want to remind you that I do not bear any responsibility for your actions - everything is at your own peril and risk.
HTC Desire S firmware- step-by-step instruction
We will install the firmware CyanogenMod 10.1. I won’t write about it for a long time, but to get acquainted with the functionality and various delights, I’ll post a video review of this CM10.1:
A logical question will arise: is it possible to install some other assembly? Answer: of course, to do this, just google your firmware or use the XDA-Developers forum. Well, or as a last resort, ask in the comments - we’ll pick something up. Just as an example, I chose CM10.1.
After reviewing the firmware for Desire S, let's start installation:
First, download a package of firmware files: various drivers, recovery, a set of Google services - in general, everything that is useful to us.
1. Go to the downloaded folder and immediately install drivers to work with HTC Sync phone (htc sync setup_3.3.53).
2. We create for convenience on drive C:\ android folder and throw there all the files (there are four of them) from the downloaded folder android-tools.
3. I have already written an article, so calmly follow the link and follow the instructions. I would like to note that HTC Desire S is not in the list (third item), so we select “All Other Supported Model”.
4. Next, let's proceed to the firmware recovery. I’ve already written a lot about how to log into bootloader htc, but I’ll still remind you: take out and insert the phone’s battery, then hold down the volume down and press the power button. A three-color menu should appear - this is our bootloader.
5. Now connect Desire S to PC via USB. In the bootloader go to fastboot item(move the volume rocker) and press the phone's power button.
6. We return to the downloaded folder: we throw all the files from Recovery (there are three of them) into the C:\android we created.
7. Open the CMD command line (for those who don’t know how: Start -> Run -> enter cmd). Enter:
fastboot flash recovery recovery.img
and again Enter. Recovery installed! Excellent!
8. I advise you to make a backup of your data just in case. To do this, go to the bootloader, select recovery item, and there we look" backup and restore".
10. And here is the point installing firmware on Desire S.
- The phone must be connected to the PC.
- Go to Recovery and select toggle usb storage.
- Now go to the downloaded folder, then copy the firmware and GAPPS folders (flinnycm101_saga_22 and gapps-jb-20130301-signed) to the Desire S memory card.
- When the copying is complete, in the same Recovery, click on the Disconnect item. Next, select install from sdcard, look for and install the firmware file CyanogenMod"a - flinnycm101_saga_22. (Details: Install zip from sdcard ->Choose zip from sdcard -> look for where we put the downloaded firmware, select and press (do not hold down!) the power button on the smartphone)
- When our firmware is installed, we install Google services in the same way - GAPPS.
- In general, almost everything is ready, all that remains is flash the kernel. Going to Bootloader in this way: in recovery select power menu -> reboot into bootloader.
11. We return to our PC, go to the downloaded folder that bothered us all and open the firmware file flinnycm101_saga_22, where do we copy the file from? boot.img to the created C:\android\
12. Go to CMD and enter:
fastboot flash boot boot.img and press Enter.
13. All that remains is to reboot: in the bootloader we find and go to the item fastboot, Further reboot.

All! We are waiting for the updated phone to download HTC Desire S with new firmware on Android 4.2.2.
I will be very grateful for your comments and reposts on social networks! Thanks, have a nice day!
The HTC Desire S smartphone is already about 4 years old. Despite the long wait for the fourth version of Android, this device remained with Android 2.3.5 and Sense 3.0 on board.
If you are still the owner of this device, then we are glad to present you with detailed instructions for updating to the unofficial version 4.2.2.
It is worth warning that after flashing the phone will return to its factory state and all your contacts from the message will be erased. Take care of their safety. The data on the SD card will remain.
Before proceeding directly to the firmware process, you need to have:
- HTC Sync – drivers for this model.
- Elements of Android SDK - a utility for working with a smartphone.
- Recovery is a system menu that allows you to work with the firmware, make backups, etc.
- The GAPPS set is a set of applications from Google.
HTC Desire S firmware instructions
- We install HTC Sync, which will help you fully work with your phone.
- Unzip the android-tools.zip archive to the root of drive C. The path should be C:\android\.
- The next stage is. Use the instructions at the link.
- Install Recovery, which you downloaded earlier. This step will later help you install the firmware on HTC Desire S and make a backup copy in case the flashing fails.
Installing Recovery on HTC Desire S
In order to enter the bootloader, you first need to jerk the battery for a few seconds. Next, hold down the Volume down key, and then the Power key. The desired menu should appear on the screen.
The next step is to connect the phone to the computer and select fastboot, after which you need to press the power key.
The Recovery archive must be unzipped into the working directory C:\android\.
Installation of recovery is carried out through the Windows command line. You must enter these commands (one by one):
fastboot flash recovery recovery.img
5. Formatting your smartphone. This stage is needed in order to eliminate any future errors in the operation of the smartphone due to the fact that files from the previous firmware remain.
To perform cleaning, go to custom recovery as already described and follow the steps wipe data/factory reset and wipe cache/dalvik cache.
6. Direct installation of the firmware. By turning on the data transfer mode via USB toggle usb storage copy the files from “CM10.1 Firmware from Andromadus” and “GAPPS Set”, which you downloaded above, and using the item install from sdcard install these archives.
7. The last step is flashing the kernel. From the firmware archive you need to copy boot.img to C:\android\ on your computer. With your phone in fastboot mode, flash the kernel using this command at the command line:
fastboot flash boot boot.img
After that, all that remains is to reboot the phone on which firmware 4.2.2 will be installed! Here are a couple of screenshots of the new firmware for HTC Desire S s510e:

In the second half of 2011, HTC announced changes to its policy regarding loader protection and provided a way to officially unlock existing protection using the website htcdev.com. However, it is worth considering that using this opportunity, you will still lose the guarantee. In this regard, in all new official firmware, starting with update 2.3.5, the loader state S-ON an additional state has appeared, now there are three of them: LOCKED, RELOCKED And UNLOCKED.
S-ON LOCKED indicates that the loader on your phone has been blocked.
S-ON RELOCKED– this RELOCKED state indicates that your loader is locked again, but before that it was already unlocked through the official website htcdev.com.
S-ON UNLOCKED– this state indicates that the loader is unlocked through the official website htcdev.com. In this case, not all memory is unlocked, unlike the case with S-OFF, so you will have to install firmware on it in two stages (more on this below). It is also worth noting that UNLOCKED does not unlock the loader partition, so you will not be able to flash to another HBOOT, and you will not be able to flash another radio module. But in S-OFF it is still possible.
How to find out which device you have S-ON or S-OFF
You need to remove the phone from fast boot mode: Settings -> Power -> Fast boot and uncheck the box here. Next, do the following:
Turn off the phone;
Press and hold the volume down button on the device and turn on the phone;
In the first line it will be written in caps S-ON for you or S-OFF;
How will it look like:
S-ON: 
S-OFF: 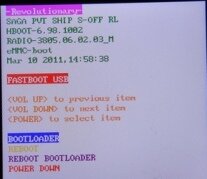

If you have S-OFF or S-ON UNLOCKED, then go straight to the point 4 .
2. When S-ON, then you need to find out your version HBOOT.
HBOOT starts immediately when the phone starts, it is responsible for checking, as well as hardware initialization of the software. This is a kind of BIOS on a PC.
How to find out the HBOOT version
You need to remove the phone from fast boot mode: Settings -> Power -> Fast boot, uncheck the box here. Further:
- turn off your phone;
- press the volume down button and keep it pressed, turn on the phone;
A screen will appear with three green robots at the bottom;
The second line from the top is the HBOOT version of your device.
3.
Get S-OFF or unlock the loader at stage UNLOCKED, can be done in different ways, depending on the loader version:
Before performing the operations described below, you must install the driver HTCDriver3.0.0.007.exe
For Hboot versions 0.98.0000 And 0.98.0002 the following: instructions for getting S-OFF through Revolutionary, instructions can be followed until you get root.
For Hboot version 2.00.0002
there are two options:
Attention, remember that all your data will be erased!
- get S-OFF by returning to the previous firmware:
For the number, software (Settings -> About phone -> Software version) up to version 2.10.401.8 inclusive, is done according to these instructions: HTC Desire S - Firmware (OS 2.3).
For the software version number 2.10.401.9, follow this link: HTC Desire S - Firmware (OS 2.3), but in point No. 2, you need to download firmware for Europe version 1.47.* RUU_htc_Europe.
So, you get the old firmware with the same old HBOOT, for which you get S-OFF via Revolutionary.
- Using this link, unlock Bootloader from HTC, as well as unlock HBOOT in S-ON UNLOCKED. We remind you that in the case of S-ON Unlocked, you can get root, then flash another firmware or another kernel, but you cannot change the hboot and radio module). This method, in theory, forever deprives you of the warranty, because... IMEIs that are involved in unlocking through the site will be blacklisted and you will be refused when applying under warranty at all official service centers. Do not pay attention to the fact that our device is not officially supported on the manufacturer’s website; select “All other supported models” from the list. Register and do everything following the instructions. There is no point in screenshots, because... everything is so detailed and as clear as possible.
HTC Desire S - detailed instructions for getting root and installing custom firmware:
rating 80 out of 80 based on 80 ratings.
There are 80 reviews in total.