How to reinstall windows 10 without losing data. How to reinstall Windows, keeping settings and installed programs
Reinstalling (updating) Windows is performed on top of the installed operating system without formatting the system partition. This saves your files and settings, as well as installed programs and their settings.
As a rule, this method is recommended in cases where all other options for solving the problem have been exhausted, although in modern Windows this is a completely acceptable solution from a technical point of view. Often, it leads to the goal much faster than dancing with a tambourine.
Windows 10 owners automatically and quietly go through this process every time a new build is released, i.e. once every six months (insiders - much more often).
Windows Recovery Tools Comparison Chart
Due to the variety of Windows recovery tools, I have prepared a comparison table. In it you will find a brief description of recovery methods and the mechanisms of their operation, as well as links to detailed articles about each of the means.
Reinstallation process
The process is identical for Windows 7, Windows 8.1 and Windows 10. You will need an installation disc (download) and a product key (Windows 7 and 8.1 only, as Windows 10 allows you to skip entering the key).
To reinstall the operating system using this method, you must log in to it. Upgrading 32-bit Windows to 64-bit is basically impossible.
Step 1 - Start reinstallation
Insert the installation disc and run setup.exe, and then in the window that opens, click the button Install.
Step 2 - install updates
Windows will prompt you to download the latest updates - it is logical to install the updated system. Of course, an Internet connection is required.

If you choose to download the updates, the download progress will be displayed in the next window.
Step 3 - Select Installation Type
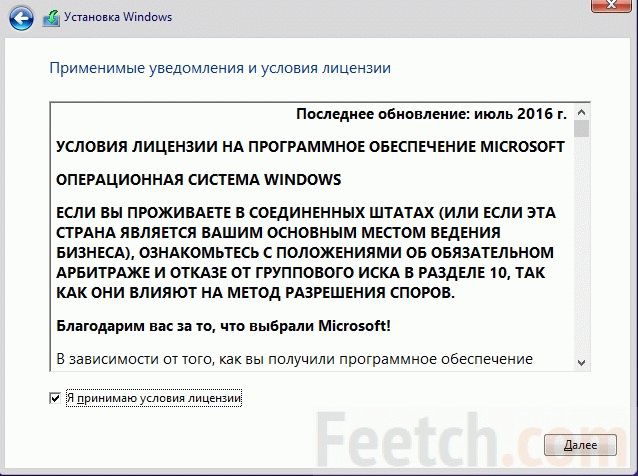
Once the updates are downloaded, the system will reboot and the installation process will begin. Once you accept the license agreement, you can select the license type.

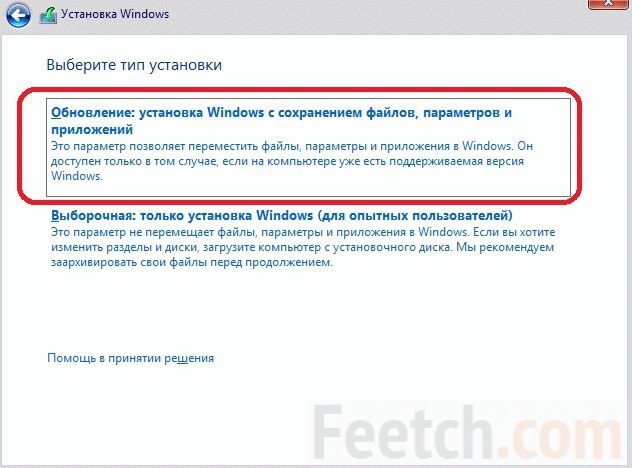
- Update- This is an installation on top of an existing system. Wherein are saved your settings and data, as well as installed programs. All system parameters (for example, service configuration) are reset and returned to standard settings, as with a new installation of Windows.
- Full installation- this is a clean installation with formatting of the system partition, or installation on another partition of the hard drive. Wherein are lost all your data and programs.
The upgrade uses Data Transfer Tool.

It saves:
- all your files and folders
- programs and their settings
- user accounts and settings
- Internet settings
- email settings
- contacts and messages
All files are saved to the same partition where the operating system is installed. During the reinstallation, a series of folders are created, in one of which Easy Transfer places these files. The figure below shows how user profiles are migrated.

Then all this data is restored to the installed system, and the temporary folders are deleted. But before you see the desktop, you'll need to go through the standard user settings process called OOBE (Out of Box Experience) - creating an account, setting language preferences, etc.
Upon completion of the update, you will have a clean Windows, which, however, retains your files, user preferences, programs and their settings. Once you have verified normal operation, you can
Are you experiencing or experiencing problems with your Windows 10 PC/laptop? Or do you want to repair your Windows 10 installation but don't want to lose apps and data? Here's how you can restore Windows 10 without losing programs or files. Windows 10 Settings prompts you to reset your Windows 10 installation while keeping your personal files. But, in the process, the reset removes installed applications, including classic desktop programs.
If you have dozens of programs installed on your Windows 10 computer and tons of data, there is no point in resetting Windows 10, since it does not provide the option to save installed applications. If you are having problems with your Windows 10 computer and want to repair your installation and solve all the issues without losing your installed programs and data, then you need to use this guide to repair your Windows 10 installation without losing your data and applications. To get to this guide, you will need either a Windows 10 ISO, a Windows 10 bootable USB, or Bootable DVD with Windows 10.
Important: as mentioned above, this method will help you save all your applications and data. But, just in case, we still recommend that you create a backup copy of all data in a safe place in case something goes wrong or goes wrong during the repair.
Repair Windows 10 installation without losing data and applications
Step 1: You can skip this step if you already have an ISO image or bootable media of Windows 10. Also, you will need to be sure to download the latest version of Windows 10 from Microsoft which uses the media creation tool in Windows 10. You can refer to our sources to download Windows 10 from Microsoft for further step-by-step direction.
Remember that you do not need to download the Windows 10 ISO if you have a bootable DVD or bootable USB for Windows 10. It is also important to note that the ISO image or bootable media must be the same version of Windows 10 that is currently installed on your computer. your PC.
Step 2: Locate the folder that contains the ISO image, right-click on the ISO file and click Mount - option to mount the ISO image. Open This PC to see New Disk. On PC, you need to right-click on the new drive and then click open in new window to open it.
If you already have a bootable DVD or bootable USB flash drive with Windows 10, you will need to connect them to your computer, then in This PC you need to right-click on the USB drive, and then click the open in new window button to Open a bootable USB drive or DVD.
Step 3: in the root folder of the ISO/DVD/USB, you will see a settings file (.exe). Double click on the installation file to start installing Windows 10.

Click Yes if you see a User Account Control message on your screen.

Step 4: You will receive a “Receiving important updates” message on your screen. Select the Not Now option, and then select or clear the I want help making your Windows installation the best option.

Click the next button. You will see “We are getting a few things ready” on the screen for a few seconds.

Step 5: Next, you will receive a license agreement on the screen. I agree to the terms of the license agreement, select the “I accept the terms of the license agreement” checkbox, and then click the following button. The installation will now check that your computer has enough space and meets the minimum system requirements.

Step 6: After a few minutes you will receive the message “Ready to install” on the screen. This is the most important stage of the procedure. On this screen, make sure you install Windows 10 Home and Pro and select Keep personal files and apps. If not, click the Edit button to save the link and then select Keep personal files and apps, an option to repair your Windows 10 installation without losing data or installed apps.


Finally, click the Install button to begin repairing your Windows 10 installation. It may take up to an hour to complete the repair or install Windows 10.


After this, you will see the lock screen in Windows 10. Press the Enter key and then enter the user account password. Windows 10 will show an animation for a few seconds before letting you go to your desktop.
That's all! You have successfully repaired Windows 10 installations without losing apps or data.
You might also want to know how to easily perform from a problematic PC.
According to the official statement from Microsoft, if you once had an installed copy of Ten on your computer, then re-activation will not be required. The installer will find the secret information, and there is no need to re-enter the key. Yes, yes, the program will not accept the key from the seven, but it can easily be activated if the user previously bothered to update Windows 8 and did everything as it should. The system communicates with the server independently. Thus, Microsoft is trying to wean us from fear and from thinking about how to reinstall Windows 10 if after July 29, 2016, the update is no longer possible.
Deleting an activated instance occurs without losing the license. Even if a clean reinstallation of Windows 10 is planned. However, nothing is said about the case when we want to add version seven or eight to our disk. Will this invalidate the license? Will it be possible to remove the old software and install new software after some time without loss? We believe that the easiest way to find out about this is from Microsoft technical support.
Established funds
The first thing that comes to mind is the regular menu. From which you can reinstall the system, saving your data or erasing everything to the last bit. Both are at the will of the user. To do this, go to settings and select Update and Security. There is a Recovery tab here, which, according to Microsoft, will help you quickly and easily get rid of problems with the system. The exact algorithm is unknown, but we believe the process involves two steps:
- Checking the registry.
- Cataloging and overwriting all system files.
The result is a pristinely clean system, but you can save all user data.
Resetting the system, as it was written, can be done by deleting or saving your files. But besides this, Microsoft provides us with a real shredder. After a certain amount of time, it will carefully erase all data in case a virus has appeared somewhere. Frankly, I can’t believe that the creators of malware are so naive as to hide it so poorly, but anything is possible. Let us explain that the shredder erases byte by byte or byte by byte (or by another algorithm) the entire available disk area.

We believe that further instructions are not needed, since everything is already very clear. The only problem may arise with updates. Usually Windows tries to save them in a hidden folder, but some users delete it to free up free space. In this case, you will have to download packages from the server and install them little by little. The plus is that there are not many updates on Windows 10, there were many more on Windows 7. Please note that the shredder does not overwrite the license. Microsoft emphasizes that after July 29, 2016, there will be no problems with a clean installation on a machine with an activated copy of the product (if this happened once). However, a complete replacement of the system, of course, will erase all user data.
Bootable media
Generally speaking, on its website Microsoft offers to immediately update any version of Ten, but for younger generations this no longer works, as we mentioned above. After July 29, 2016, the company's policy changed dramatically. Now you can reinstall Windows 10 without losing data only through bootable media:
- Flash drive.
- DVD disc.
We do not exclude that other exotic options are possible, but we will not consider them as unnecessary. The media is created by the Microsoft Media Creation Tool. This is a truly universal tool that will allow you to perform at least three tasks (to choose from):
- create a boot image of any version of Windows 10;
- burn a DVD using the created .ISO file;
- create a bootable USB drive.
This is the full range of problems that may arise during the process. You can download the Media Creation Tool at microsoft.com/ru-ru/software-download/windows10. The location may change periodically, so check this point using a search engine.
Reinstallation process
Let's imagine that we have a DVD with a distribution kit. Everything is installed from a flash drive in the same way. We put the drive first in the list of boot devices. Here is an example of BIOS settings for a typical PC. We remind you that entering SETUP is done by pressing one of two keys, which one depends on the version of the motherboard:
This is an important point because (especially on laptops) the images change so quickly that there is no way to detect the text at the bottom of the screen. There is a chance that you will have to try both keys. Patiently click them at a rate of 2-3 times per second until the settings window appears.
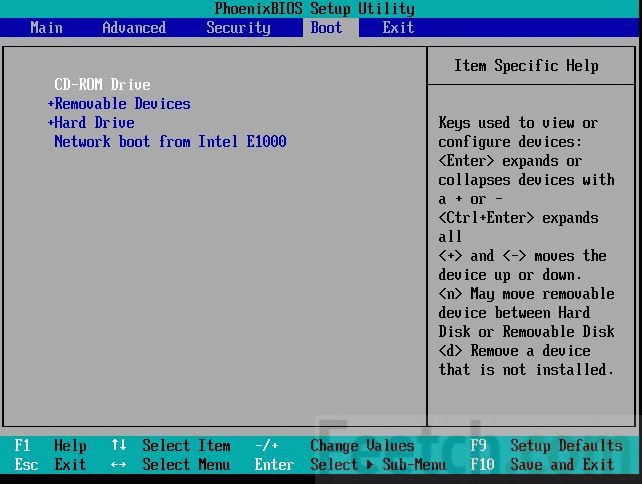
Moving devices up and down is done by pressing the plus and minus keys on the keyboard. These are standard combinations. Put the drive first. After this, you need to exit, saving the settings: F10 → Enter (select Yes when exiting).

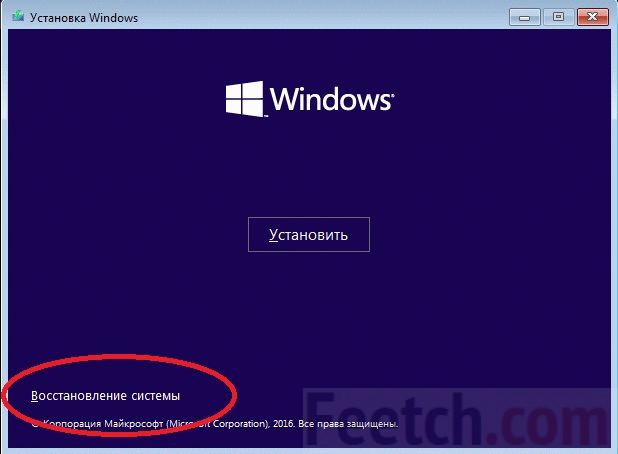
At the time of reboot, carefully read the inscriptions. As a rule, the Windows installer during this period requires you to press “any key” on the keyboard. This takes approximately 5 seconds; the dots that appear serve as a countdown. Don't miss the moment! It is recommended to create a combined media (multi-boot) for 32 and 64 bit processors. Next, you need to wait patiently until the distribution package unpacks the interactive interface and starts polling us for the desired options. Along the way, there will be a System Restore option in the windows, skip it, we have other plans, click install. After some time, a window will appear asking you to enter a key, read it carefully, it says something just for our case.
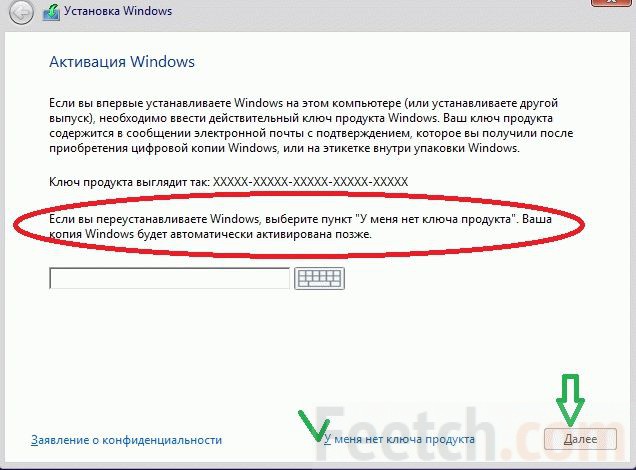
Click I don’t have a key because the corporation advises so. Next, a list of dozens of versions will appear. Carefully select the one that is already there. Because otherwise you will be returned to the very beginning. Nobody needs this. The next step is to accept the terms of the license agreement.
Reinstalling Windows 10 requires selecting the appropriate option. It's called Update. Just like what we discussed at the beginning. This will reinstall Windows 10 while preserving all user programs. In principle, the selective type allows you to do the same thing, but you need to be at least a little aware of what exactly is being done. Otherwise, you can easily destroy your operating system along with files, settings and programs.
From under the running operating system
We have seen that it is possible to reinstall Windows 10 without a disc. But if there is a desire, the installer can easily be launched directly from under a running operating system. This changes practically nothing. At least in cases where you need to reinstall Windows 10 on a laptop or desktop system unit.
If the system does not boot
There is another option when the system does not boot at all. We do everything in the same way as described above until the window with the Install button appears. It is here that in the lower left corner there is the inscription System Restore. This is where you need to click.
Often, inexperienced users, purchasing new equipment, begin to experiment with it. There are no other ways of practical learning - reading articles is no substitute for practical experience. But this method of training also has a downside - complete failure of the system or its malfunctions. What to do in this case? You need to find out how to reinstall Windows 10 and the problem will be solved.
How to reinstall Windows 10 on Windows 10
If the system boots, you can simply try to restore it. What's good about 10 is that it has . And if it loads, then you can take advantage of it.
So, the reinstallation of Windows 10 to Windows 10 will be completed successfully.
Clean reinstallation of Windows 10
With the previous method, there is not a complete reinstallation, but a system rollback. If you want to reinstall Windows completely, read below.
Create bootable media. We'll tell you how to do this from the Microsoft website, but you must have a key in order to activate the license in the future. Go to the website https://www.microsoft.com/ru-ru/software-download/Windows10 and read the instructions carefully. Start downloading.


This is a boot device creation program. Press. After a short wait, the program will ask for consent to launch - answer “Yes”. We accept the conditions.

Select media creation.

Created for this PC, leave a checkmark - the program knows the parameters. If you are creating for someone else, uncheck this box and enter it manually.

We decide - flash drive or disk.


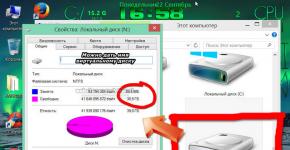
At this point, an important action must be taken. Double-click "This PC" on your desktop. And write down the capacity of the hard drive partitions. During installation there will be no letters or names. In order not to make a mistake by installing the system on the wrong disk, you need to know which one is the system one.

After finishing, you need to install the boot device in the BIOS. Reboot and login. On most PCs, when loading, it is written which button can be used to do this - F12, F8, DEL. On laptops it's a little more difficult. For example, Lenovo has a special button for rebooting into the BIOS. Search.
We went to the menu, find Boot and move to it using the keyboard arrows.

Set the desired parameter – flash drive or CD/DVD drive.

We save using the F10 button and the reboot begins again. But from a new medium. At this moment the installation will begin to occur.


You will be asked for a key. If it exists, enter it. If not, click "I don't have a product key."
Select version. There is also a nuance here. You cannot install PRO on top of home. And vice versa.

The only exception is purchasing a license for the corresponding assembly.
select an installation option. Since we need to reinstall everything again, click on the second option.

Now information about the capacities of hard drive partitions will come in handy. Select the one you want, click “format” and then “Next”.

File copying will begin.

After which there is again a request to enter the key, if it was not specified or the system did not detect it. Click "Do it later."
They will offer to connect to wi-fi if a network is found within range or if the PC has a wifi modem. You can connect or skip this step.

A prompt appears to select the location (not geographical) of the computer - select the second item - home PC.

Enter your login and password with confirmation.


This concludes the process. You managed to reinstall Windows 10 to Windows 10.
Overall, completely reinstalling Windows 10 is not that difficult. You have to be careful and careful, and the system will do everything on its own.
Correctly reinstall Windows 10 on a laptop
On laptops everything is done the same way. There is a nuance for keys flashed into the BIOS. If you are reinstalling with Windows 8.1, purchased in a store along with the device, then you probably had the key. And it is hardwired into the BIOS.
So, during installation, no keys will be needed and the system will be activated automatically. This is a great gift for owners of licensed 8s and 7s. After all, a dozen costs about 8,000 rubles. It turns out to be a bit expensive.
Reinstall Windows 10 on Windows 7
With Windows 8, everything is clear - an unsuccessful brainchild and automatic updating to Windows 10 is a kind of apology for its bugs.
Windows 7 users are wondering: is it possible to reinstall Windows 10 on Windows 7? Certainly. If you had a key, use it. During installation, enter your Microsoft credentials and the new OS will be activated automatically.
If you are a convinced supporter of free software, use activators.
Reinstalling Windows 10 on Windows 7 is carried out in exactly the same way as described above - using the MediaCreationTool application.
With the release of the tenth version of the Windows operating system, the user world was divided into two camps. Some immediately rushed to install the new OS, others were skeptical about it, believing that it, as usually happens, contained too many bugs. But today most of the problems have been resolved, so let’s focus on the question of how to switch to Windows 10 using several basic methods. Along the way, let's consider the problem of saving data and installed user applications.
Should I switch to Windows 10?
Initially, when the system first appeared, both optimists and skeptics were right in their judgments. Indeed, quite a lot of innovations and even several unusual functions have appeared in the system. However, against the backdrop of all this, there were obvious shortcomings related to the fact that after the transition the “Start” button might not work, the system openly monitored the user, etc.
Today, most of the problems have been eliminated, thanks to the constant release of various updates. In particular, this applies to the Anniversary Update. And user reviews indicate that, for reasons unknown to many, the tenth modification is faster than even the seventh, although Windows 7 is considered to be less demanding on system resources.
Minimum System Requirements
Before solving the problem of how to switch to Windows 10, you need to familiarize yourself with at least the minimum requirements for the system configuration. But here the Microsoft specialists made an obvious mistake.

The very first thing is the space occupied on the hard drive. Officially, for a normal installation of a new system on a hard drive, a minimum of 16 or 20 GB is required. Unfortunately, reviews from both users and specialists indicate that Windows 10 under no circumstances wants to be installed if there is less than 30 GB of free space on the hard drive. More precisely, the system is installed up to a certain point, and almost at the final stage of installing updates it reports that a return to the previous OS is being initiated.
With hardware the situation is much simpler. How to upgrade to Windows 10 from Windows 7? As a minimum configuration, you can use dual-core processors with a clock frequency of 1 GHz, 1 or 2 GB of RAM, depending on the bit depth of the new OS, and video chips that support the DirectX platform version 9.
However, it is worth considering the fact that upgrading to Windows 10 can only be done from versions 7 and 8.1. For some reason, previous modifications and the eighth version do not have such support (for them you need to download the distribution separately and perform a so-called “clean” installation). In addition, the operating systems themselves from which the transition is made must have all the latest updates installed.
Transition queue
Now, actually, about how to switch to Windows 10 from Windows 7 or 8.1. There were several ways. In the simplest version, as it was before, you could switch to Windows 10 for free by registering on the official Microsoft resource and queuing for an update.
But, starting from the end of July last year, the free version of Windows 10, updated directly from the website of the developer corporation, became unavailable. But, according to many users, even despite this, in any case, sooner or later the update will take place. But in the Update Center settings you should set the option to automatically download and install updates.
Transition using the Microsoft utility
Many people didn’t want to wait their turn, so even Microsoft experts themselves recommended using a special utility called Media Creation Tool (MCT), which can be downloaded from the website. By the way, its use is still relevant today (but only for supported systems).

How to upgrade to Windows 10 using this software product? There are two options here. When launched, the initial window suggests either updating your computer right now, or creating an installation disk for installation at another time or on another device. The installer itself runs directly within the existing OS environment, rather than from the boot device.
When you select the first item, the download of the distribution files begins, after which during the installation process you just need to follow the instructions of the “Wizard”. Moreover, if a licensed operating system was previously installed, you do not need to activate the new one. However, even when installing Windows 10 without having an account, you don’t need to create one either, but more on that later.
How not to lose important data and installed programs
The utility itself allows you to switch to Windows 10 without losing data. This means not only saving user files, but also settings, and even all installed programs.

To do this, at a certain stage of installation, you just need to select the appropriate item. And, according to the vast majority of all those who switched to Windows 10 in this way, all applications that worked in the previous system function without problems in the new modification, with the same user settings and installed parameters.
How to go from 8 to 10? Windows: clean installation
The transition on unsupported systems will have to be carried out using a separately downloaded installation distribution or one created using MCT.

There is, however, one catch here. If there are no particular problems with optical media, then with USB drives not everything is so simple. The fact is that sometimes the installer, when choosing a partition on which to install a new system, informs that only GPT format partitions can be used, and installation on a partition containing MBR boot records is impossible. How to switch to Windows 10 in this case?
To fix the problem, you first need to go into the BIOS settings. To their surprise, many users will see not one, but two flash drives there. Reviews say that these seem to be the same device, but one of them, which is in boot priority, has an EFI format. In order for the installation to start in normal mode, you just need to select a standard device and boot from it. The problem disappears.
Account creation and activation issues
In the question of how to switch to Windows 10 in any way, you cannot ignore some additional questions. Although it is stated that a Microsoft account is required to install the system, this is not true.

When installing from scratch, registration creation and activation can be postponed by selecting the necessary items in the appearing windows with suggestions. But the system will still require activation sooner or later. What to do in this situation? As practice shows, most users use a special utility, KMSAuto Net, which is an activator for Windows and MS Office, although this, frankly speaking, is not entirely legal.

The program itself is a portable application that does not require installation. After launching it, you just need to select Windows activation, wait for the procedure to complete and confirm entering the task of permanent “reactivation” every ten days in the “Scheduler”. As is already clear, the utility cannot be deleted. But all repeated processes will run in the background, and the user will not even know about it.
What to do if the user doesn’t like Windows 10?
Finally, let's see how to switch from Windows 10 to Windows 7, if it was the seventh version that was updated (this option is also suitable for 8.1). During the transition, the developers made sure that the user had the opportunity to roll back to the previous system.

To do this, in the settings section of the new system, you need to select the recovery menu, where there will be an option to roll back the computer to the previous version. But even here there are pitfalls. You can make a reverse transition only within 30 days from the date of installing Windows 10 and only if the files of the old system were not deleted. Otherwise, rollback will become impossible.
But what if the deadline has expired? Unfortunately, there are no options other than installing the seventh version with full formatting of the system partition. But that's not even the problem. During the formatting process, you will have to change the structure of the file system for cases where Windows 10 has a 64-bit architecture, and the Windows 7 being installed is a 32-bit modification.
A few final words
It remains to add that when installing the tenth modification, you must have an Internet connection, since updates will be downloaded during the installation process. There's no getting around this. And the installation process itself can take quite a long time. According to users who performed such manipulations, with minimal configurations and an Internet connection speed of 100 Mbit/s, complete installation will take about five hours, so you will have to be patient.